
Starting bookbinding at home is an incredibly rewarding pursuit that transforms loose sheets of paper into beautiful, functional journals, sketchbooks, or custom novels. While professional binderies utilize heavy cast-iron presses, specialized guillotines, and expensive standing tubs, a beginner requires only a handful of simple, accessible hand tools to achieve clean, durable results. By focusing on a few versatile items, you can easily set up a workspace on any flat table or desk without overspending.
In tropical environments like the Philippines, high humidity levels introduce unique challenges to paper crafts. Excess moisture in the air can soften paper fibers, warp cover boards, and cause standard craft glues to dry slowly or even attract mold. Selecting the right tools and materials is not just about ease of use; it is about ensuring your handmade books survive the climate. Understanding how to evaluate, test, and maintain your starter kit will save you from common beginner frustrations and protect your hard work.
Core Hand Tools for Folding, Creasing, and Piercing
A bone folder is the first tool you will hold when preparing paper. This simple, polished tool is used to crease folded sheets of paper (called folios) into neat sections (called signatures). While cheap plastic folders are widely available, they often leave a shiny, burnished residue on paper fibers, which ruins the matte finish of high-quality drawing or writing paper. Genuine cattle bone or polished teflon folders are highly recommended because they glide smoothly across paper without leaving marks or snagging.
Products mentioned in this guide
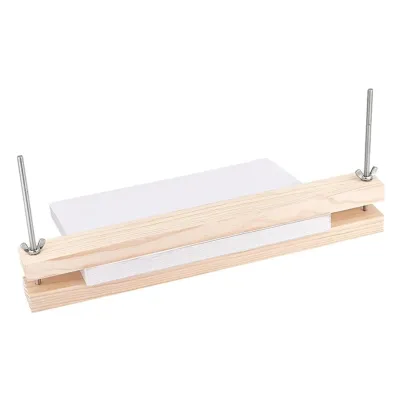
![[PREMIUM QUALITY] 1pc Paper Clip Board Book Binding Clipboard Wooden Press Binding Machine For Paper Diy Bookbinding](https://img.lazcdn.com/g/p/542fee76a0c34bf2644044fae7b057b6.jpg_400x400q80.jpg_.webp)
![[In Stock] Bookbinding Splints Paper Splints Wooden Paper Press Binders](https://img.lazcdn.com/g/p/03dfce62d5f745191d542bc834d11fcb.jpg_400x400q80.jpg_.webp)
Prices are valid at publication and may change. Please refer to the product page for the latest price.
To check the quality of a bone folder before purchasing, run your thumb along its edges to ensure there are no rough seams, burrs, or sharp points that could slice through delicate sheets. The tool should feel smooth and comfortable in your hand, with a slightly pointed tip for scoring and a wider, flatter edge for smoothing down glued surfaces.
An awl is equally critical, as it is used to punch sewing holes along the folds of your signatures. Look for an awl with a comfortable, bulbous wooden handle that fits snugly in the palm of your hand, allowing you to apply controlled downward pressure safely. The needle should be relatively thin and straight rather than heavily tapered. A heavily tapered scratch awl can easily create excessively large holes if pushed too deep, leaving loose stitches and exposing the thread to unnecessary wear.
Before working on your final project, always perform a quick test on scrap paper of the same weight. Fold a sheet and run the bone folder along the crease to ensure it creates a sharp, flat fold without tearing. Punch a few holes with the awl to verify that the needle pierces the paper cleanly rather than pushing and tearing the fibers.
Needles and Thread for Sewing Signatures
Bookbinding needles differ from standard sewing needles in both shape and sharpness. Tapestry needles (typically sizes 18 to 22) are ideal because they feature blunt tips. A sharp sewing needle can easily pierce the thread of an existing stitch or slice through the paper fold, weakening the structural integrity of the binding. The needle’s eye must be large enough to accommodate thick bookbinding thread easily, yet the overall shaft should not be so thick that it stretches the punched holes.

Linen thread is the traditional standard for bookbinding due to its long fibers, exceptional tensile strength, and resistance to stretching over time. Cotton thread is a viable, budget-friendly alternative for beginners, but regardless of the material, the thread must be waxed. Waxing lubricates the thread as it passes through the paper, significantly reducing friction, preventing frustrating knots, and helping the stitches hold their tension during the sewing process.
You can purchase pre-waxed thread or buy a small block of pure beeswax to coat plain thread yourself. Simply pull the thread through the beeswax a few times, then run it between your fingers to distribute the wax evenly. This simple step is especially helpful in humid climates, as the wax coating helps protect the thread from absorbing moisture.
Always read product labels carefully to confirm that both your thread and paper are acid-free and archival-safe. In warm, humid climates, acidic materials degrade rapidly, leading to yellowing, brittle pages, and broken threads within a few years. Investing in acid-free consumables ensures your handmade books remain intact for decades.
Adhesives, Brushes, and Gluing Essentials
Polyvinyl acetate (PVA) is the essential adhesive for bookbinding. Unlike standard school glue or white craft glue, professional-grade bookbinding PVA is formulated to remain flexible after drying. This flexibility allows the spine of the book to bend repeatedly without cracking. It is also acid-free, ensuring it will not eat away at the paper or cause discoloration over time.
A flat, stiff-bristled utility brush (about 1 to 2 inches wide) is perfect for spreading glue evenly over large surfaces like cover boards. Avoid soft watercolor brushes, which hold too much water and can oversaturate the paper, leading to severe warping. For smaller projects, a simple glass jar or a small plastic container can serve as a glue pot, allowing you to portion out only what you need and keep the main bottle sealed.
Always work in a well-ventilated room when using craft adhesives. In humid tropical climates, the high moisture content in the air slows down the drying process of water-based glues. To prevent paper warping and mold growth, ensure good airflow in your workspace, perhaps using a small fan, and allow glued components to dry thoroughly under flat weights.
Cutting, Measuring, and Alignment Tools
Precision is the foundation of bookbinding. A heavy metal ruler (stainless steel or aluminum) with a non-slip backing is indispensable. Plastic or wooden rulers are easily damaged by sharp blades, which can lead to crooked cuts and ruined materials. An L-square or a small machinist’s square is also vital for checking that your cover boards and paper signatures are cut at perfect 90-degree angles.
A self-healing cutting mat is a non-negotiable safety tool that protects your work surface and prevents your blades from dulling prematurely. Pair this with a heavy-duty utility knife or a craft knife featuring snap-off blades. Snap-off blades are highly practical because they allow you to easily maintain a razor-sharp edge, which is necessary for slicing through thick greyboard (the dense cardboard used for book covers) without tearing the edges.
A dull blade requires more force to cut, which increases the risk of the knife slipping and causing injury. If you notice the blade dragging, tearing the paper, or requiring excessive pressure, it is time to snap off the dull segment or replace the blade entirely. Always cut in multiple light passes rather than trying to force the knife through thick board in a single stroke.
Building a Budget-Friendly Starter Kit
You do not need to buy a complete, expensive bookbinding kit on day one. Start with a phased approach. For your very first project, focus on the absolute essentials: a sharp utility knife, a metal ruler, a basic needle, some cotton thread, and a small bottle of flexible white glue. Once you confirm your interest in the craft, invest in a dedicated bone folder, a proper awl, and archival-quality linen thread.
Many specialized tools have excellent household equivalents. A smooth plastic ruler, the back of a clean metal spoon, or a smooth plastic butter knife can serve as a temporary bone folder. A heavy sewing needle pushed into a wine cork can act as a makeshift awl. Instead of an expensive book press, you can sandwich your drying books between two flat wooden boards and stack heavy textbooks or clean bricks on top.
Basic supplies can be sourced affordably from local stationery shops, hardware stores, or online marketplaces. When shopping online, pay close attention to product descriptions and user reviews to verify tool specifications. Avoid generic “craft kits” that bundle low-quality plastic tools; instead, purchase individual, high-quality items step-by-step to build a reliable toolkit that will last for years, keeping your initial setup cost well under ₱1,000.
Frequently Asked Questions (FAQ)
Can I use regular sewing thread for book binding?
Standard polyester sewing thread is generally not recommended for bookbinding. It is designed for sewing machines and fabric, meaning it is very thin and has a high tensile strength relative to its thickness. Under the tension required to bind a book, thin polyester thread can act like a wire saw, slicing through the paper folds of your signatures over time. Bookbinding thread is significantly thicker, softer, and waxed, which distributes the tension evenly across the paper and prevents tearing.
How do I maintain and clean my bookbinding awl and bone folder?
To maintain your hand tools, wipe away any adhesive residue immediately with a slightly damp cloth before the glue cures. Never submerge wooden-handled awls in water, as this can swell and split the wood. Store your metal tools in a dry container or drawer to prevent rust, which is especially common in humid climates. Keep your bone folder clean and free of oils by wiping it down after use; any dirt or adhesive left on the tool can easily transfer to and ruin your next paper project.
Community discussion
Share your experience or ask a question. Comments are reviewed before publication.