
Erasing ballpen ink without tearing or thinning the paper requires a delicate balance of friction, pressure control, and surface preparation. Unlike graphite pencil marks that sit loosely on top of paper fibers, ballpoint and gel inks penetrate deep into the cellulose structure of the page. Removing this bound pigment requires physically wearing away a microscopic layer of the paper itself, meaning any excessive force or incorrect movement will immediately compromise the structural integrity of your document. By mastering a systematic, light-handed technique, you can lift stubborn ink marks cleanly while keeping your sheets smooth and intact.
Understanding How Ballpen Erasers Work
To erase ink successfully, you must first understand the mechanical difference between pencil and ink erasers. Standard pencil erasers rely on adhesion; the soft rubber or vinyl is stickier than the paper, allowing it to grab and lift graphite particles. Ink erasers, often referred to as sand or silica erasers, rely on mild abrasion. They contain tiny, sharp abrasive particles like silica or pumice embedded in a firm rubber or vinyl matrix. These particles physically scrape away the top layer of paper fibers where the ink has bonded.
Because ballpen ink is formulated to be permanent, it uses heavy solvents, water, or oil-based dyes designed to sink deep into the paper fibers and dry quickly. Gel ink, in particular, saturates the paper even deeper than traditional oil-based ballpoint ink. Because the color is not merely resting on the surface, a standard soft eraser will simply glide over the ink or smudge any unfixed pigment across the page, doing nothing to lift the stain.
Products mentioned in this guide
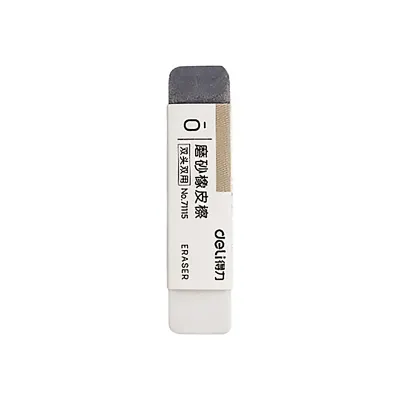
10 Lazada user ratings
The quality was great and it came as advertipsed, though small and the size of a regular finger. Still this might become my go to eraser. 8/…Read full reviewShow less
The quality was great and it came as advertipsed, though small and the size of a regular finger. Still this might become my go to eraser. 8/10 Should be bigger
💰Price:10/10 🎨Design:10/10 ✅Quality:10/10 Okay naman. So far nakakabura naman ng pen marks. Satisfied naman ako sa item. Legit siya. Hehe. T…Read full reviewShow less
💰Price:10/10 🎨Design:10/10 ✅Quality:10/10 Okay naman. So far nakakabura naman ng pen marks. Satisfied naman ako sa item. Legit siya. Hehe. Thanks seller. 👍
High-quality eraser, Perfect for erasing pencil marks, and also good for erasing ballpen ink too. Thanks Seller at kay Kuya Rider.
Great for precision erasing, Durable and long-lasting,
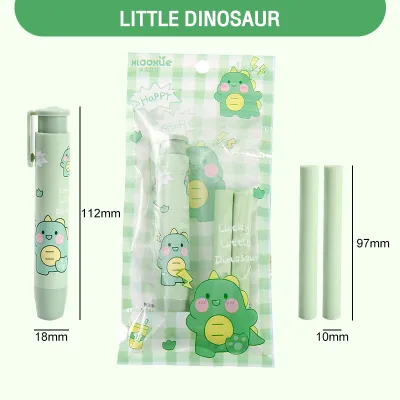
295 Lazada user ratings
The press eraser feature is very convenient., The retractable eraser is so cute!, The pencil eraser is of high quality., The pencil eraser i…Read full reviewShow less
The press eraser feature is very convenient., The retractable eraser is so cute!, The pencil eraser is of high quality., The pencil eraser is of high quality., The eraser pen is easy to use.,
The press eraser feature is very convenient., The eraser pen is easy to use., The retractable eraser is so cute!, The pencil eraser is of hi…Read full reviewShow less
The press eraser feature is very convenient., The eraser pen is easy to use., The retractable eraser is so cute!, The pencil eraser is of high quality.,
The retractable eraser is so cute!, The eraser pen is easy to use., The press eraser feature is very convenient.,
The pencil eraser is of high quality., The eraser pen is easy to use., The retractable eraser is so cute!,
The eraser pen is easy to use., The pencil eraser is of high quality., The retractable eraser is so cute!,
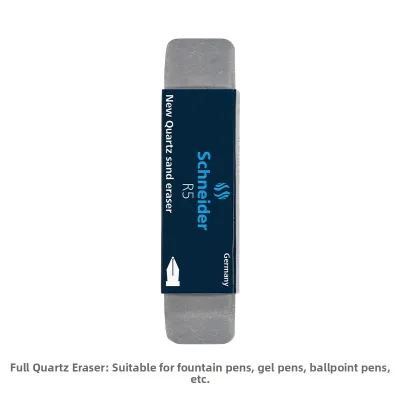
7 Lazada user ratings
It's pretty useful, but feels a bit rough. I personally prefer Pentel.
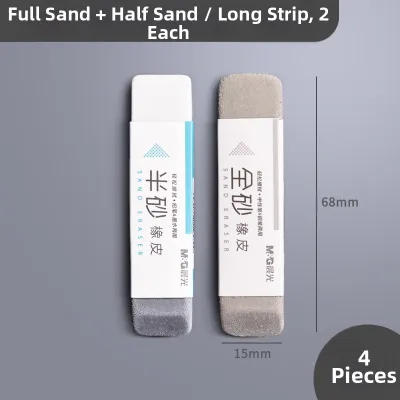
291 Lazada user ratings
The product is good, and the customer service is nice. Totally worth buying!
Prices are valid at publication and may change. Please refer to the product page for the latest price.
Setting realistic expectations is crucial before you begin the erasing process. Complete, invisible removal is not always possible and depends heavily on the depth of the ink penetration, how long the ink has had to dry, and the thickness of the paper. A fresh, light stroke on heavy cardstock is highly erasable, whereas a deeply pressed, dried signature on thin notebook paper may only be faded to a faint shadow before the paper begins to fail. Understanding this limitation prevents you from pushing the paper past its breaking point.
Preparing Your Paper and Workspace
Before you even touch the eraser to the page, you must prepare the physical environment to prevent accidental damage. Place your document on a completely flat, hard, and non-yielding surface. Working on a soft desk pad, a stack of loose papers, or a wooden table with a heavy grain can cause the paper to bend or catch under the pressure of the eraser, leading to instant creases or tears. A smooth laminate desk, a glass surface, or a sturdy plastic clipboard provides the ideal backing.

Next, evaluate the paper itself to gauge its fragility. Check its thickness, texture, and grain before applying any abrasive tool. Thin papers, such as standard 70 GSM copy paper or lightweight notebook sheets, have very little structural tolerance for abrasion and will tear quickly. Heavier papers, like 100 GSM or higher drawing paper, mixed media sheets, or high-cotton bond paper, can withstand significantly more friction. Look closely at the surface texture; highly textured or laid papers have raised ridges that will wear down unevenly, making it harder to achieve a clean erase without leaving noticeable flat spots.
Finally, inspect the eraser tool to ensure it is clean and ready for use. A dirty eraser is one of the primary causes of smudged, ruined documents. If the eraser has been used previously, its surface may be coated with graphite dust, dried ink, or oils from your hands. Rub the tip of the eraser vigorously against a clean scrap piece of paper until any dark residue is completely gone and the abrasive surface looks fresh and uniform.
Step-by-Step Technique for Erasing Ballpen Ink
To begin, hold the eraser close to its working tip. This grip gives you maximum control over the angle and prevents the eraser from flexing or slipping out of your hand. Avoid holding it at the far end, which forces you to apply uneven downward pressure to maintain contact. Keep your wrist relaxed but firm, allowing your fingers to guide the tool with precision.
The most critical rule of ink erasing is to apply light, consistent pressure. Do not press down hard in an attempt to speed up the process. Crushing the paper fibers under heavy pressure traps the ink deeper into the damaged sheet and makes a tear almost inevitable. Instead, let the abrasive particles in the eraser do the work. The pressure should be barely heavier than what you would use to write with a fine-point pencil.
Use short, gentle strokes in a single direction. Avoid the natural instinct to rub aggressively back and forth. Back-and-forth friction heats up the paper fibers, weakens their bonds, and causes them to bunch up and tear. By erasing in one direction—lifting the eraser off the page at the end of each short stroke before returning to the starting point—you minimize heat buildup and keep the paper fibers lying flat.
Frequently pause during the process to inspect your progress. Every few strokes, stop erasing and gently brush away the accumulated debris. This allows you to monitor exactly how much ink has been lifted and check for any early signs of paper wear. It also prevents the abrasive crumbs from being ground back into the paper, which can cause secondary smudging or scratching.
Recognizing When to Stop Erasing
Knowing when to stop is just as important as the erasing technique itself. You must watch for specific visual and tactile cues that indicate the paper has reached its physical limit. The first sign of danger is “pilling” or “fuzzing,” where tiny, loose fibers begin to stand up on the surface of the page. This indicates that the top protective sizing of the paper has been worn away, and you are now grinding into the delicate core fibers.
Another warning sign is increased translucency. If you hold the paper up to a light source and the erased area appears brighter or more see-through than the surrounding page, the paper has thinned significantly. At this point, any further friction will create a hole. If the paper feels soft, spongy, or unusually flexible under your fingertip, the structural integrity is compromised, and you must cease erasing immediately.
Understand the point of diminishing returns. As you erase, the remaining ink is often embedded so deeply that it cannot be reached without completely destroying the paper. If you notice that several consecutive strokes fail to lift any more pigment, you have reached this limit. It is always better to accept a faint, clean ink shadow than to tear a hole through an important document. A light shadow can often be written over or ignored, whereas a physical tear or hole is impossible to hide and permanently ruins the page.
Managing Eraser Residue and Stubborn Ink Marks
Once you have finished erasing, you must clean up the residue carefully. Use a soft-bristled drafting brush, a clean microfiber cloth, or a dry makeup brush to sweep away the eraser crumbs. Never use your bare hands to swipe the crumbs away, as the natural oils and moisture on your skin can transfer to the freshly abraded paper, causing it to attract dirt or smudge any remaining ink particles.
Avoid the common habit of blowing on the paper to clear the debris. Blowing can inadvertently introduce tiny droplets of saliva onto the exposed, highly absorbent paper fibers. This moisture will cause the paper to swell, warp, or wrinkle, and if you attempt to write over the damp area later, the new ink will bleed and feather uncontrollably.
If you are left with a stubborn ink mark that cannot be safely erased further, pivot to alternative correction methods. For fragile papers, covering the remaining shadow with a high-quality correction tape or a thin layer of correction fluid is the safest choice. Ensure the paper is completely dry and free of eraser dust before applying any correction media, allowing it to adhere smoothly without peeling.
Testing and Matching Erasers to Paper Types
Before attempting to correct an important document, always verify the compatibility of your eraser and paper. Read the manufacturer labels carefully to ensure the eraser is specifically formulated for ink removal. Standard vinyl or rubber pencil erasers are not abrasive enough and will only damage the page through useless friction, while heavy-duty industrial erasers may be too aggressive for standard stationery.
Perform a hidden test on a scrap piece of the exact same paper stock, or choose an inconspicuous corner or margin of the document you are working on. Draw a small line with the same pen you used, let it dry completely to match the state of the original mark, and practice your erasing technique on it. This trial helps you gauge how the specific ink and paper combination responds to the eraser.
Observe the test area closely under good lighting. Check if the paper pills, discolors, or loses its original finish. If the test area remains smooth and clean, you can proceed to the main correction with confidence, knowing exactly how much pressure the paper can handle.
Frequently Asked Questions (FAQ)
Can I use a standard pencil eraser to remove ballpen ink?
No, standard pencil erasers are designed to lift graphite through adhesion and lack the mild abrasive particles required to scrape away dried ink. Attempting to use a pencil eraser on ballpen ink will only result in excessive friction, which heats up and damages the paper fibers without removing the ink, often leaving a dark, messy smudge.
Why does my paper keep tearing even when I use light pressure?
This usually happens if the paper is too thin (low GSM) or if the eraser itself has become hard, dry, or dirty. Over time, erasers can oxidize and lose their flexibility, causing them to catch and drag on paper fibers rather than gliding smoothly. Additionally, if the paper has absorbed moisture from the air, its fibers weaken, making it highly susceptible to tearing even under minimal pressure.
Is it safe to use a ballpen eraser on glossy or coated paper?
No, it is highly risky. Glossy or coated papers have a thin, non-porous surface layer that gives them their shine and prevents ink from sinking deep. An abrasive ink eraser will instantly strip away this coating, leaving a dull, rough patch that ruins the appearance of the page and prevents any subsequent ink from adhering properly.
Community discussion
Share your experience or ask a question. Comments are reviewed before publication.